Monday, November 30, 2009

Pie Pops


For activity day the week before Thanksgiving we made
pie pops with the girls. They were really excited to bake and even more excited that they all got their own rolling pins. I found the rolling pins in the dollar section at Joann's and had to get them for the activity. I found the pie pop idea through a blog of a blog that linked to bakarella. The girls loved them and were excited that it was easy enough that they could make them again at home. We used box pie crust mix to keep things simple and I gave them several choices of filling. I had fresh berries mushed and tossed in cornstarch and sugar, apples chopped and sprinkled with sugar cinnamon and a little nutmeg, and several canned pie filling that to my surprise were very fresh and tasty. The only thing I think we did wrong was not place our sticks further up in the pies. Some of the girls pie pops were a little to top heavy to stay on the sticks.


I think I am going to make some of these for my Christmas party without the stick. The scalloped cookie cutter made these mini pies look super cute.

Saturday, November 21, 2009

The Perfect Turkey

I love this recipe. It has served me well in Holidays past and has never failed me. If I am in-charge of the turkey this is how it is going to get done. Happy Thanksgiving Everyone!

Ingredients:

1 twenty- to-twenty-one-pound fresh whole turkey, giblets and neck removed from cavity and reserved
1 1/2 cups (3 sticks) unsalted butter, melted, plus 4 tablespoons unsalted butter, room temperature
1 750-ml bottle dry white wine
2 teaspoons salt
2 teaspoons freshly ground black pepper
Classic Stuffing
1 cup dry red or white wine, for gravy (optional)


Directions:
  1. Rinse turkey with cool water, and dry with paper towels. Let stand for 2 hours at room temperature.
  2. Place rack on lowest level in oven. Heat oven to 450 degrees. Combine melted butter and white wine in a bowl. Fold a large piece of cheesecloth into quarters and cut it into a 17-inch, four-layer square. Immerse cheesecloth in the butter and wine; let soak.
  3. Place turkey, breast side up, on a roasting rack in a heavy metal roasting pan. If the turkey comes with a pop-up timer, remove it; an instant-read thermometer is a much more accurate indication of doneness. Fold wing tips under turkey. Sprinkle 1/2 teaspoon each salt and pepper inside turkey. Fill large cavity and neck cavity loosely with as much stuffing as they hold comfortably; do not pack tightly. (Cook remaining stuffing in a buttered baking dish for 45 minutes at 375 degrees.) Tie legs together loosely with kitchen string (a bow will be easy to untie later). Fold neck flap under, and secure with toothpicks. Rub turkey with the softened butter, and sprinkle with remaining 1 1/2 teaspoons salt and pepper.
  4. Lift cheesecloth out of liquid, and squeeze it slightly, leaving it very damp. Spread it evenly over the breast and about halfway down the sides of the turkey; it can cover some of the leg area. Place turkey, legs first, in oven. Cook for 30 minutes. Using a pastry brush, baste cheesecloth and exposed parts of turkey with butter and wine. Reduce oven temperature to 350 degrees. and continue to cook for 2 1/2 more hours, basting every 30 minutes and watching pan juices; if the pan gets too full, spoon out juices, reserving them for gravy.
  5. After this third hour of cooking, carefully remove and discard cheesecloth. Turn roasting pan so that the breast is facing the back of the oven. Baste turkey with pan juices. If there are not enough juices, continue to use butter and wine. The skin gets fragile as it browns, so baste carefully. Cook 1 more hour, basting after 30 minutes.
  6. After this fourth hour of cooking, insert an instant-read thermometer into the thickest part of the thigh. Do not poke into a bone. The temperature should reach 180 degrees.(stuffing should be between 140 degrees.and 160 degrees. and the turkey should be golden brown. The breast does not need to be checked for temperature. If legs are not yet fully cooked, baste turkey, return to oven, and cook another 20 to 30 minutes.
  7. When fully cooked, transfer turkey to a serving platter, and let rest for about 30 minutes. Meanwhile, make the gravy. Pour all the pan juices into a glass measuring cup. Let stand until grease rises to the surface, about 10 minutes, then skim it off. Meanwhile, place roasting pan over medium-high heat. Add 1 cup dry red or white wine, or water, to the pan. Using a wooden spoon, scrape the pan until liquid boils and all the crisp bits are unstuck from pan. Add giblet stock to pan. Stir well, and bring back to a boil. Cook until liquid has reduced by half, about 10 minutes. Add the defatted pan juices, and cook over medium-high heat 10 minutes more. You will have about 2 1/2 cups of gravy. Season to taste, strain into a warm gravy boat, and serve with turkey.

Friday, November 20, 2009

Sprinkle Some Fun on Breakfast


Add a little sprinkle of fun to your kids breakfast.

Jayna loves all the colorful sprinkles I use while making desserts for parties. So I decided to surprise her by adding them to her breakfast pancakes. It was a simple way to put an extra big smile on her face. This idea would also be fun to do for Birthday breakfasts, or when your kids have done good in school, or any other fun excuse you can find to praise them and make them feel special.

Wednesday, November 18, 2009

Holiday Guest Favors


I am going to be holding a Christmas open house party since both Ryan's side of the family and my side of the family will be in-town for Christmas. We think it will be a good opportunity to have both families together and will allow us to see everyone at the same time so we do not have to be running from place to place Christmas week.

I saw these felt corsages in my recent Martha Stewart magazine and I thought they looked so festive and would be fun to make for all my guests to wear the night of the open house. So hopefully between making the playhouse, and painting the playroom I will be able to make these cute little guys.


Monday, November 16, 2009

Pottery Barn Kids Playhouse Lookalike

pottery barn playhouse

This last Saturday Ryan, Jayna, and I all went to Pottery Barn Kids to buy two red Everyday chairs for her Dr. Seuss playroom, that hopefully will be "mostly" done by Christmas (cross my fingers). While there Jayna loved playing with the different toys and kitchens, but she especially loved this little playhouse. She loved looking out the windows and playing pica boo with the door. I was talking to Ryan about how much she liked it and he said we should make her one for the playroom. I was surprised he wanted to do another project for that room, but I was not going to pass up the offer. I said regarding the frame "you think you can make that?", his response was "I can make that in two seconds!" So I challenged him to make it that night...

Instructions on This Project:

1. We figured out all of our measurements. Pottery Barn Kids had most of them listed on their website so that was a good starting point for us.

how to make pottery barn kids playhouse lookalike
how to make a playhouse
2. Ryan went to the hardware store and picked up several PVC pipes and lots of PVC joints.
how to make po ttery barn kids playhouse lookalike
3. We cut all of our PVC pipe down to the right lengths using a pipe cutter. Your husband may have one if he has ever worked on the sprinklers. It is a lot easier then using a hack saw and there is no mess with the pipe cutter.

how to make a kids playhouse
4. We started putting our frame together with all of our joints we purchased.

kids felt playhouse
5. The pitched roof took some additional calculating of which I can not re-explain to you since square roots were involved.

how to make a felt playhouse
6. Then with-in less then twenty minutes (almost = to two seconds) We had the frame of our playhouse.

So Pottery Barn can keep it's $200 playhouse. Although now it is up to me to sew the fabric for it and add all the little touches and details to it. I am going to do the house out of felt and it will be a Dr. Seuss house of course. I just have to find time to fit it in before Christmas.

I will have more details on this project later, and depending on how easy it is to sew I will think about selling kits if anyone is interested. This playhouse is a lot like the card table playhouses if you have seen those. I love the pitched roof though and it allows taller older kids to play in it as-well. So your kids will not grow out of it as fast.

So, thank you awesome husband!

Thursday, November 12, 2009

Holiday Neighbor Gifts


diy neighbor gifts
If you are thinking about what to do for neighbor gifts this year here is an idea. I did these fortune cookies dipped in colored chocolates and sprinkles last year and they turned out really great. We placed them in fortune cookie boxes with colored tissue paper. Then made custom labels to go on the front of the boxes. We made a lot of them and I was worried it was going to take forever to do, but the dipping of the fortune cookies went surprisingly easy and fast.

chocolate dipped fortune cookieschristmas neighbor gifts idea

Wednesday, November 11, 2009

Back in the Day Crafts


I was visiting a friends blog the other day and saw this picture of a dress we had made for her dog. I had totally forgot about that particular dress, but defiantly remember our adventure into making dog clothes for our little furry friends. Our husbands did not want us buying dog clothes with the little money we had a college students so we found our way around that and made our own.

I think I will keep Back in the Day Crafts as a recurring thing and post about crafts from the past either I or others have done.

Monday, November 9, 2009

Free Custom Blog Headers


custom blog headers

My background on my family blog went MIA the other day, so I decided it was time for a change. I was not sure what I wanted, but knew I wanted something unique and different. So I made this little nifty header for myself. I found a
website that has a ton of free Ps brushes, and went to town downloading them. Then I used the brushes to my liking to make my header. Now I just need to widen my margins and decide if I want to make a matching background. Either way I think it is a vast improvement from what I had before. Then since I was on a roll and wanted to keep on creating I made two others.


custom blog headers
custom blog headers

They are both made for family members blogs, but I just did them for fun. I have no idea if they would want to use them or not.

So here is my offer since I am having fun making these headers. If you send me an email with a link to your blog address and your blog has a "the Bird and the Berry" button on it I will make you a free blog header. I will leave this offer open until Friday the 13th at midnight.

Birthday Party Favor Bags

boy birthday party favor bags


These may look like little kid birthday favors, but they were actually for my husbands 29th birthday party that we had on Saturday. He is married to Miss party planner, but every year he does the same thing on his birthday. We go to the nickel arcade with his closest friends (and every 7 year old that has their birthday on the same day as him), get hot wings, and play at the house for the rest of the night. So each year I sneak a little cuteness into the boy event by making them party favor bags that have fun treats in them that they can snack on while they play video games. The boys, I mean men really like them and look forward to what will be in the bag each year.

party favor tags

This year I made these cute little labels that can be printed out and cut to fit plain brown paper lunch sacks. I thought they looked fun, and fit in with the nights activities.

Saturday, November 7, 2009

Saving Pumpkins Seeds

pumpkin seeds
This was the first year that I have ever bought white pumpkins. I just love the angelic look of them and have always wanted to buy white ones. So to not let my perfect pumpkin purchases go to waste I decided to harvest the seeds in hopes that I can plant them in the yard this next spring. I have never planted pumpkins before let alone preparing my own seeds for storage. So I looked up on line how to do it and all the instructions I found were pretty simple.

Instructions on this project:

I washed the seeds with water and placed them on a drying rack making sure I sifted through them every once in awhile. Then after a couple of weeks or so of drying I put the seeds into envelopes. Now all I have to do is place them in a dry dark place (my basement kitchen), and cross my fingers it worked.

saving pumpkin seeds

So I am really hoping that I will be-able to have a post next fall showing off my home grown white and orange pumpkins.

Friday, November 6, 2009

Trying Pie

raspberry pie

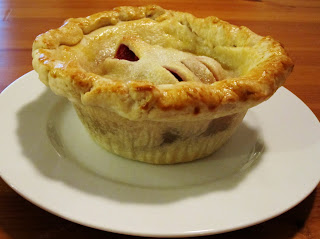
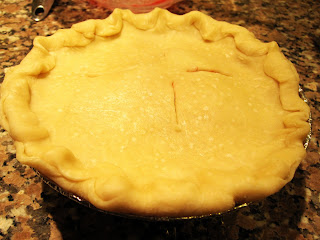
So I have decided that for Activity Days this month I am going to teach the girls how to make pie since it will be close to Thanksgiving time. Problem is I have never made pie! So last night I did a practice run. I was planning on making blackberry pie, but there were no blackberries at the grocery store, so I got raspberries instead. I bought some small tin baking dishes to see if I could successfully make little individual pies.

mini pie

I made my dough, but I think I added a little to much water. Then I dusted the raspberries in sugar a dash of salt and cornstarch and placed them in the center of the little pies. I put the top crust on and then baked them. They turned out pretty decent, but my crust dropped down into the pie instead of rising or staying where it was. The filling was a little to liquidy too. Maybe more cornstarch would have taken care of that, but I am not sure.

pie

I love how pies look. They are so organic looking, and to me are the most domestic thing a girl can make. I will look forward to the day that I can make a homemade pie out of berries from my garden. Until then I will just pretend I picked the berries.

Wednesday, November 4, 2009

Funeral- Memory Cards / Life History

funeral cards
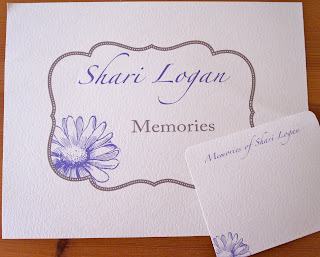
Sorry for the lack of interesting posts these last couple of days. We had a death in the family over the weekend and the funeral services were Tuesday. So the only projects I have to post about today are the memory cards I made for the funeral and the life history I printed up. I am so use to doing baby shower invites or birthday party themes which are so fun, bright and happy. It seemed like no matter what I did to these cards they still seemed gloomy and drab, but here they are. If you would like to read more about the funeral and circumstances head-on-over to Hutchings Home for the whole scoop. I will be posting a part II of the story soon.
funeral programs

Sunday, November 1, 2009

Mum Baby Shower

flower invitations
I have been planning this cute floral themed baby shower for someone the last couple weeks. She first asked me to make some invitations for her based off of some that she had found on etsy. This is what I came up with for her. I love the paper and envelopes we picked out too. We are doing a cream textured paper for the invitations themselves with rounded corners, and then are doing a brown paper bag like textured envelope that we printed the same mum flower onto. They make the design look really organic.

tissue paper flowers
I came up with these really cute tissue paper flower pins that she will be giving to all the guests to wear during the shower as-well. They are based off of the Martha tissue paper pom-poms. I thought they turned out fabulous, and was very proud of myself for coming up with the idea. I will do another post later on everything I have done for this shower and will list exactly how much it cost to do everything. That way everyone can see just how affordable it is to have the Bird and the Berry (me) help you with your next event.