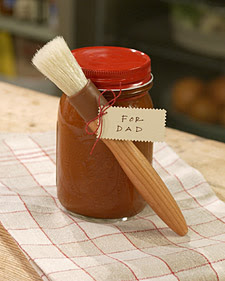
Fathers Day is coming up soon so I wanted to share some fun gift ideas I found via Martha. I added my own little twist to some of them and a tutorial so
"Read On".
"Read On".

We loved this idea and used it one year. We found the worlds best homemade BBQ sauce recipe and brewed some up for our dads. We packaged them real cute similar to the picture above and found basting brushes at the dollar store. Here is the recipe we used. It has a lot of ingredient, but is well worth it.
Big Al's Kansas City Bar-B-Q Sauce
- 2 cups ketchup
- 2 cups tomato sauce
- 1 ¼ cups brown sugar
- 1 ¼ cups red wine vinegar
- ½ cup unsulfured molasses
- 4 teaspoons hickory-flavored liquid smake
- 2 tablespoons butter
- ½ teaspoon garlic powder
- ½ teaspoon onion powder
- ¼ teaspoon chili powder
- 1 teaspoon paprika
- ½ teaspoon celery seed
- ¼ teaspoon ground cinnamon
- ½ teaspoon cayenne pepper
- 1 teaspoon salt
- 1 teaspoon coarsley ground black pepper
In a large saucepan over medium heat, mix together the ketchup, tomato sauce, brown sugar, re wine vinegar, molasses, liquid smoke and butter. Season with garlic powder, onion powder, chili powder, paprika, celery seed, cinnamon, cayenne, and salt and pepper.
Reduce heat to low, and simmer for up to 20 minutes. For thicker sauce simmer longer, and for thinner simmer less. Sauce can also be thinned using a bit of water if necessary.
Reduce heat to low, and simmer for up to 20 minutes. For thicker sauce simmer longer, and for thinner simmer less. Sauce can also be thinned using a bit of water if necessary.
How cute are these labels. My husband loves hot sauces and these would be perfect to put on some to give him for Fathers Day. You can find the labels to download here.
This would be a great idea. Now that the weather is warming up the family car cleaning parties in the driveway can begin. The dollar store often has car cleaning mitts, and we love the Armor All interior wipes we get at Walmart.
I almost fell over when I saw this great and amazing idea. Flip books made from your home video clips.
Martha did not offer a tutorial and just had a link to a company that can make them for you. Don't worry though I found some instructions online and even made my own flip book for Dad.
Here is how I did it!
Flip Book Tutorial
Tools Needed:
Video
Photoshop
Photo-paper
Scissors or Paper Cutter
Drill and Drill-bit
C-clamp
Scrap piece of wood
Colored Paper
Ribbon
First Step: Pick a short video or a short portion of a video that you would like to use. This video needs to be somewhere on your computer.
Second Step: Under "File" in Photshop click on "import" and then on "Video Frames to Layers"
Third Step: Select the video you would like to use and click "load". In next window click on "Selected Range Only" if you are not using the entire video for your flip book and follow the directions below that selection to select the portion of video you would like to use. Also select "Limit To Every 2 Frames" to cut down on the number of layers and pages to make your book.
Fourth Step: Now you will have a file with a layer for every frame of video. I suggest not having anymore than 100 layers. Remember every layer will end up being a page in your flip book. The one I made had about 35 or so pages. You can always just erase layers at the beginning or end of your video if needed. Next you will need to make and save a file for every layer. Go to "File" then click on "Script" and then "Layer Comps to Files"
Then choose a destination for where you want the files saved and click run. Depending on how many layers you have and what type of computer this may take awhile.
Fifth Step: Go to the file where all your layers are saved and open them all up into Photoshop. Then click on "File", "Automate" and "Contact Sheet".
I chose to have mine be 2 columns and 3 rows, but you can change that depending on how big you want the flip book to be. Then click "OK"
Sixth Step: Now you have your sheets to print. Print each sheet out onto photo-paper.
picture courtesy of photojojo
Seventh Step: Before cutting number the back of each picture in-order so you can make sure they do not get mixed up. Cut each frame out and stack them in the correct order.
picture courtesy of photojojo
Eighth Step: C-clamp your stack of photos to an old wood scrap and drill two holes in the left side of the stack so that you can bind the stack together.
Ninth Step: Put the ribbon through the holes in the stack tie and or add your cover. Then enjoy!
These would be so fun as party or wedding favors. The possibilities are endless with this one.


12.15.09+no+background.gif)


No comments:
Post a Comment