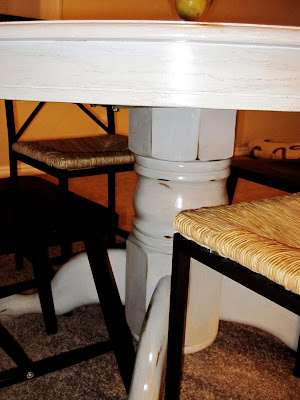
A: Me! After transforming a $75 old wood table from craigslist into the kitchen table of my dreams.
I knew I wanted a round kitchen table in this house before we even signed the papers. Like everything though my dreams exceeded my budget, and my husbands comprehension of what pretty things in this world cost. So I took things into my own hands to assure I got what I wanted. Also when you know you can do things yourself it makes it hard to shell out the dough for someone else's labor. Plus doing things yourself allows you to customize things to your own liking.
I first stripped the table, and to be honest this was the first time I have ever stripped anything. Usually I just rough it up with sandpaper, but since this table will be used on a daily bases and had a factory finish on it I opted to strip it. My dilemma was that I was going to have to strip it indoors since it is too cold in the garage and outside. So finding a stripper that was not harsh with toxic fumes was a must. I came across CitriStrip at my local hardware store. I was hesitant about how well it would work, but I gave it a try. It not only worked fantastic, but it made my whole basement smell like oranges. It is still very messy so you will want to put some plastic down. I also found that the plastic scrappers worked better than the metal scrappers on this project.
After all the stripping was done and the table was cleaned off I lightly sanded any rough areas with a fine sandpaper, and wiped off any dust with a lint free rag. Remember the lower the number the heavier the sandpaper. Then it was time to paint...
I wanted a grey paint and found a really nice color from Benjamin Moore called San Antonio Gray. I always get my Benjamin Moore colors mixed at Home-depot in Behr paint to save a little money. Most the time they have the formulas in their system so you just have to give them the color name. I choose a satin finish for this project. To paint the table I used foam brushes to get the smoothest application, and in-between coats buffed the table with crumbled up brown paper bags. If your bags have print on them make sure you do not use the side with print to buff. I did two coats of paint on my table. If you want it to be more durable you can do up to three coats. It looked great just like that, but I wanted something with a little more character.
 So after painting the whole table I roughed up some of the edges and raised portions by sanding them down to the bare wood. This will give it an antiqued look. I also got a small scrap piece of wood and randomly pounded some nails through it and then in select places hit it against my table making little pin holes in the wood. Once I got the desired look I wanted I went on to the next step of glazing...
The glaze color I used is called Van Dyke Brown and is from a local wood furniture store called Wood Connection. They have beautiful furniture and offer both finished and unfinished pieces. They have both a showroom and a factory in Salt Lake (I have only been to the factory though). The people are very helpful and nice and I highly recommend buying from them. They have great how to instructions for different projects, you just have to ask for them. I thinned the glaze with a little water and applied it to the table in sections using a foam brush and then wiped it off immediately with a lint free rag. This process is a lot easier if you get a friend or hubby to help you. That way one of you can apply the glaze and the other can wipe. The glaze looks best if you brush and wipe in long stokes going with the grain of the wood.
Next I applied a stain to the sanded areas of the table. The glaze did not darken the sanded areas like I wanted so this is how got my desired look. I bought a little can of Minwax stain in Dark Walnut and simply applied it to the sanded areas with a q-tip and then wiped it off with a rag. The longer you leave the stain on the darker it will make the wood, but you really need not leave it on for any longer than a minute at the very most. Now my table was ready for the final step.
Last but not least I applied 3 coats of top coat in a satin finish to the entire table. I bought this top coat at the furniture store along with the glaze. It is a self leveling top coat and is also applied with a foam brush. The key to this step is to not over brush, and to use long even overlapping strokes. This top coat process is to not be overlooked. It will make all the difference and give your project a truly professional look. It also makes your paint job and piece that much more durable.
I am so happy with my final product! It is just how I imagined. I was nervous about the paint color and antiquing because my plan all along has been to paint my kitchen cabinets the same as this table. Now I am more excited than ever to one day transform my kitchen with this same color and process.
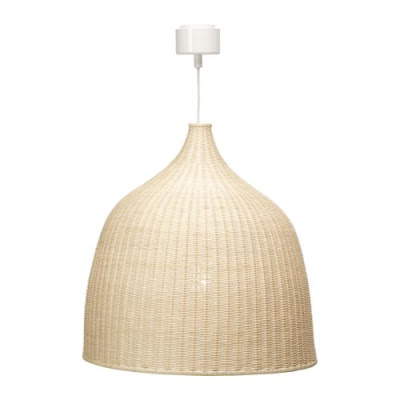
Soon I will be buying this light to go over the table...
Now if I could just get rid of that carpet in there. That will not be for a few more years I'm afraid.
Note: Like always if you need help with a project or have questions about this one just send me an email or leave a comment.


12.15.09+no+background.gif)


love it!
ReplyDeleteThat looks AMAZING!!! Great job. This is a project I am taking on in a few months, Thanks for the great tips!
ReplyDelete~Tana
That will be fun! Hopefully you can find the top-coat I used. That made all the difference I think.
ReplyDeleteThis project only took me a weeks worth of nights working after my kid went to bed. My only really good suggestion is to use plastic drop clothes when you do the stripping. It is a mess and you will just want to roll it up and throw it away. Good Luck! Send me a picture or a link when you are finished.
Your table looks awesome. I love the finish! That was a good tip about buffing with paper bags. I'll try to remember that one. Just blog surfing today and saw this from shanty2chic made without my hubby party. Better late than never, right? That's what I love about blogs, you can always go back and catch up when you have some free time.
ReplyDeleteTake care,
Rose
Thanks for the comment Rose! Seriously the finish is amazing when you do the process I did and use the General Finishes products I did. I am not just saying that because they are a sponsor either. In-fact I loved their products so much that I asked them to participate with the blog. I may be having a giveaway as soon as next month and the prize will be a 1/2 gallon bottle of Citristrip, so come back soon and look for details about it. See you later Rose.
ReplyDeleteYour table looks fantastic! I plan on doing mine and our bar/buffet in the next couple months. Thanks for sharing the products you used. Amazing job!!!
ReplyDeleteVery few things Make me as happy as stumbling upon a blog and thinking, Oh Wow! Do they get paid for this? I am so glad I found this Blog! Wow, I Have a Lot To Learn! Thanks for sharing your experiences, observations, and wisdom! It makes my life a whole lot easier!
ReplyDeleteKeep Calm and Blog On! :C)
K*Sara: Glad you like the blog. Thanks for visiting! Feel free to contact me if you have questions about anything.
ReplyDeletefantastic! and i love that you don't have 4 of the same chair. awesome dining room makeover :)
ReplyDeleteIt looks great! I love the finish you achieved and I think it was 100% the right move to strip it before painting it. Nice work!
ReplyDeleteThe table came out great! I love that grey color, subtle but bold statement.
ReplyDeleteCourtney@frog2fab.blogspot.com
I can't tell you how happy I am that I found this posting (and the whole blog really!). I'm scheduled to pick up a table almost identical to yours this evening which I found on craigslist for $10!!! I've been looking for a round table for a few weeks now but am on a tight budget, so I knew whatever piece I found would have to be revamped. I so needed these steps to help me out. Thanks so much!!!
ReplyDeleteI just bought a kitchen table on craigslist and knew it would need a facelift. I painted it but it is soooo sticky. After seeing your comment on another site, I popped over to this blog post. I skipped/didn't know about using a top coat. I am purchasing the same one you used and can't wait to see the results!!! Thanks!
ReplyDelete