The fire-pit area and benches are now complete and ready to enjoy. I am so happy with how it turned out, and know we will be enjoying it for years to come.
Showing posts with label ikea. Show all posts
Showing posts with label ikea. Show all posts
Monday, October 3, 2011
Thursday, February 3, 2011
Wednesday, March 17, 2010
The Craft Room of My Dreams

condo craft room
When we were looking for a new home after selling the condo it was hard to find a house with everything we wanted, but that is always the struggle when looking for a home. Then we found the house we are currently in. It had everything we wanted and much much more than we ever thought we would get out of a home. It was a home I had found online, and I remember walking into it for the first time. It seemed to good to be true, the first floor was so open and it was fresh looking. I walked past the living room and dining room, and then I turned the corner from the family room to see this space off the kitchen dining area.
"Ahhhhhhhh"(in angelic heavenly voices) is what I must have heard. It was the holy grail of craft room spaces right down to the french doors that adorned its entrance. (ignore the mess in there) I wish I could share it with every crafty women who does not have enough space at home, who is crafting at the kitchen table, or working out of a makeshift closet.
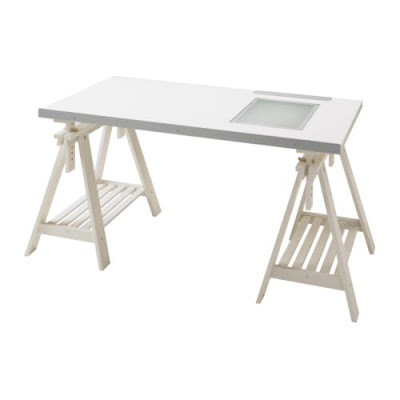
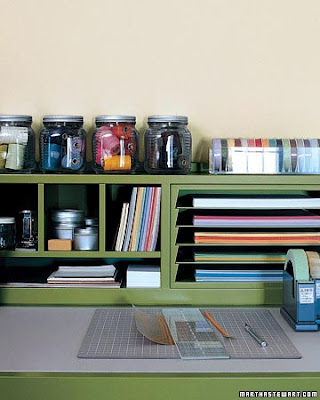
 We are going to be building desks that I will paint black to go around the room similar to these Pottery Barn ones, and we will also have some storage bookcases on one of the walls as-well. I am hoping to also put shelving in white around the top of the room like the picture above.
We are going to start slowly working on this room, and this is my inspiration. I have already bought the paint. It is going to be the same color blue as the playroom upstairs that we did for Jayna.
 We are going to be building desks that I will paint black to go around the room similar to these Pottery Barn ones, and we will also have some storage bookcases on one of the walls as-well. I am hoping to also put shelving in white around the top of the room like the picture above.
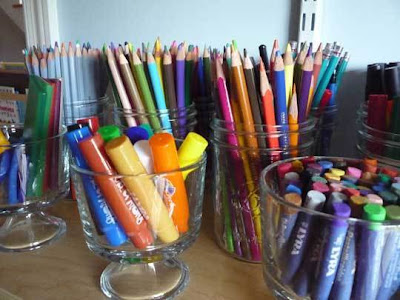
I have big visions for this room and love that it also has a little door to the backyard off of it. I picture kids doing homework, me sewing drapes, and the husband working on the computer at a corner desk. Here are some other craft room inspirations that I love. I will keep you updated on this room as we go. For now we will all dream together.
Labels:
before and after,
decorating,
furniture,
ikea,
paint colors,
sewing
Tuesday, February 9, 2010
Let There Be Light

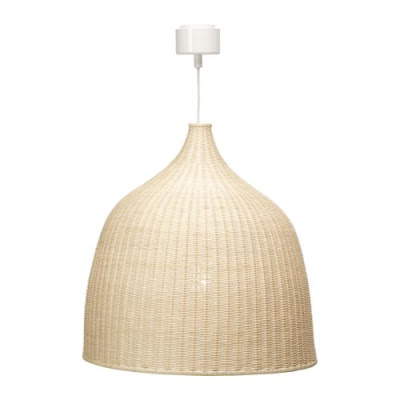
The new kitchen table light is up and I love it. It now feels like there is suppose to be a table there.
I got the light at Ikea and hope to get the matching chairs that I mentioned before sooner than later. I will also most-likely be replacing the black dresser you see in the background with the refurbished gun cabinet which will be painted in the same grey as the table. So it is getting there.
Labels:
before and after,
decorating,
furniture,
ikea
Monday, January 25, 2010
Q: What smells like oranges and is grey and brown all over?
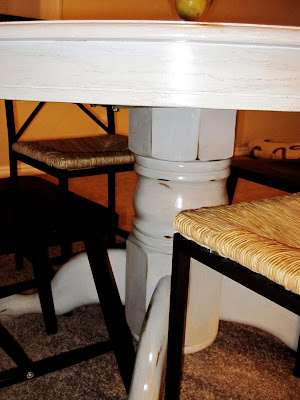
A: Me! After transforming a $75 old wood table from craigslist into the kitchen table of my dreams.
I knew I wanted a round kitchen table in this house before we even signed the papers. Like everything though my dreams exceeded my budget, and my husbands comprehension of what pretty things in this world cost. So I took things into my own hands to assure I got what I wanted. Also when you know you can do things yourself it makes it hard to shell out the dough for someone else's labor. Plus doing things yourself allows you to customize things to your own liking.
I first stripped the table, and to be honest this was the first time I have ever stripped anything. Usually I just rough it up with sandpaper, but since this table will be used on a daily bases and had a factory finish on it I opted to strip it. My dilemma was that I was going to have to strip it indoors since it is too cold in the garage and outside. So finding a stripper that was not harsh with toxic fumes was a must. I came across CitriStrip at my local hardware store. I was hesitant about how well it would work, but I gave it a try. It not only worked fantastic, but it made my whole basement smell like oranges. It is still very messy so you will want to put some plastic down. I also found that the plastic scrappers worked better than the metal scrappers on this project.
After all the stripping was done and the table was cleaned off I lightly sanded any rough areas with a fine sandpaper, and wiped off any dust with a lint free rag. Remember the lower the number the heavier the sandpaper. Then it was time to paint...
I wanted a grey paint and found a really nice color from Benjamin Moore called San Antonio Gray. I always get my Benjamin Moore colors mixed at Home-depot in Behr paint to save a little money. Most the time they have the formulas in their system so you just have to give them the color name. I choose a satin finish for this project. To paint the table I used foam brushes to get the smoothest application, and in-between coats buffed the table with crumbled up brown paper bags. If your bags have print on them make sure you do not use the side with print to buff. I did two coats of paint on my table. If you want it to be more durable you can do up to three coats. It looked great just like that, but I wanted something with a little more character.
 So after painting the whole table I roughed up some of the edges and raised portions by sanding them down to the bare wood. This will give it an antiqued look. I also got a small scrap piece of wood and randomly pounded some nails through it and then in select places hit it against my table making little pin holes in the wood. Once I got the desired look I wanted I went on to the next step of glazing...
The glaze color I used is called Van Dyke Brown and is from a local wood furniture store called Wood Connection. They have beautiful furniture and offer both finished and unfinished pieces. They have both a showroom and a factory in Salt Lake (I have only been to the factory though). The people are very helpful and nice and I highly recommend buying from them. They have great how to instructions for different projects, you just have to ask for them. I thinned the glaze with a little water and applied it to the table in sections using a foam brush and then wiped it off immediately with a lint free rag. This process is a lot easier if you get a friend or hubby to help you. That way one of you can apply the glaze and the other can wipe. The glaze looks best if you brush and wipe in long stokes going with the grain of the wood.
Next I applied a stain to the sanded areas of the table. The glaze did not darken the sanded areas like I wanted so this is how got my desired look. I bought a little can of Minwax stain in Dark Walnut and simply applied it to the sanded areas with a q-tip and then wiped it off with a rag. The longer you leave the stain on the darker it will make the wood, but you really need not leave it on for any longer than a minute at the very most. Now my table was ready for the final step.
Last but not least I applied 3 coats of top coat in a satin finish to the entire table. I bought this top coat at the furniture store along with the glaze. It is a self leveling top coat and is also applied with a foam brush. The key to this step is to not over brush, and to use long even overlapping strokes. This top coat process is to not be overlooked. It will make all the difference and give your project a truly professional look. It also makes your paint job and piece that much more durable.
I am so happy with my final product! It is just how I imagined. I was nervous about the paint color and antiquing because my plan all along has been to paint my kitchen cabinets the same as this table. Now I am more excited than ever to one day transform my kitchen with this same color and process.
Soon I will be buying this light to go over the table...
Now if I could just get rid of that carpet in there. That will not be for a few more years I'm afraid.
Note: Like always if you need help with a project or have questions about this one just send me an email or leave a comment.
Labels:
before and after,
d.i.y,
decorating,
furniture,
ikea
Monday, December 21, 2009
Dr.Seuss Playroom
Santa's elves are all done with Jayna's Dr. Seuss playroom. It has turned out really nice. I was shocked at how well the toys fit. I thought for sure I would need double the storage, but I didn't. In the future I will probably add another bookcase or two, but for now the storage is perfect. I didn't even use one of the white baskets and three of the pop-up storage bins.

Here are before pictures of the playroom. It was just a basic plain white room with no closet and a little alcove.

Out in the hall I hung this picture of Dr.Seuss books above the door going into the playroom. I love how it looks so much that I am now planning on putting little frames above all the doors in the hall hinting to what rooms they are. Kinda like on imagination movers. lol. You stay-at-home moms know what I am talking about. It will look so much better once I paint the hall too.
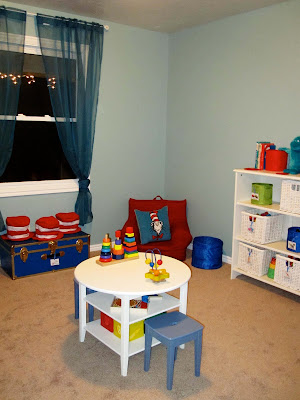 We painted the room Tembleque from Kwal paints. It is a really pretty blue with a little hint of green. I think I may even paint my craft room downstairs this same color. The table, stools, baskets, and bookcase are from Ikea and were really good prices. I found the blue trunk forever ago at a thrift store and even consigned it, but no-one bought it so I ended up with it again. I have kept it all this time hoping to find the perfect home for it. I am glad I did because it looks great in this room and holds tons of toys. The red chairs are the medium size Pottery Barn Kids everywhere chairs. I think they are even on sale right now. The curtains are also from Ikea and where really cheap, and the Dr. Seuss hats I bought at Target for the Dr. Seuss baby shower I did awhile back.


 I made these little labels for all the toy baskets. I thought it would be a good teaching tool to help little Jayna learn how to put her toys away. To make them I just took pictures of some of her toys on top of a white piece of paper. Then I loaded them into photoshop and adjusted the levels of the colors a little, printed them out onto photo-paper, and used self-laminate sheets to make them kid durable.
 On one of the walls I but a large magnet board I picked up at Ikea. I placed it really low so that she could use it while sitting on the floor. I have not found any good magnet letters for her yet, so I turned the buttons I used at the Dr.Seuss baby shower into magnets. I just took the pins out and added little strips of adhesive magnets to the back of them. I had picked these bags up at Target too and decided they would look cute hung on hooks in the playroom. Jayna loves filling up little bags with toys and treasures so I thought she would enjoy using these.

So the only thing left to do is paint the huge Dr.Seuss murals. Who knows when I will get around to doing that. I am just glad I was reasonable enough to know I could not do it before Christmas.
Well my Christmas party is tomorrow so I better get baking.

Here are before pictures of the playroom. It was just a basic plain white room with no closet and a little alcove.

Out in the hall I hung this picture of Dr.Seuss books above the door going into the playroom. I love how it looks so much that I am now planning on putting little frames above all the doors in the hall hinting to what rooms they are. Kinda like on imagination movers. lol. You stay-at-home moms know what I am talking about. It will look so much better once I paint the hall too.
 We painted the room Tembleque from Kwal paints. It is a really pretty blue with a little hint of green. I think I may even paint my craft room downstairs this same color. The table, stools, baskets, and bookcase are from Ikea and were really good prices. I found the blue trunk forever ago at a thrift store and even consigned it, but no-one bought it so I ended up with it again. I have kept it all this time hoping to find the perfect home for it. I am glad I did because it looks great in this room and holds tons of toys. The red chairs are the medium size Pottery Barn Kids everywhere chairs. I think they are even on sale right now. The curtains are also from Ikea and where really cheap, and the Dr. Seuss hats I bought at Target for the Dr. Seuss baby shower I did awhile back.

Here is the finished playhouse. It turned out super cute and I am very proud of myself for whipping it out as fast as I did. I still need to trim the door a little and we are going to make a miner adjustment in the frame. I love it. I think this will be Jayna's favorite part of the room so I am really glad we thought of it.(click for playhouse frame how to)
 I made these little labels for all the toy baskets. I thought it would be a good teaching tool to help little Jayna learn how to put her toys away. To make them I just took pictures of some of her toys on top of a white piece of paper. Then I loaded them into photoshop and adjusted the levels of the colors a little, printed them out onto photo-paper, and used self-laminate sheets to make them kid durable.
 On one of the walls I but a large magnet board I picked up at Ikea. I placed it really low so that she could use it while sitting on the floor. I have not found any good magnet letters for her yet, so I turned the buttons I used at the Dr.Seuss baby shower into magnets. I just took the pins out and added little strips of adhesive magnets to the back of them. I had picked these bags up at Target too and decided they would look cute hung on hooks in the playroom. Jayna loves filling up little bags with toys and treasures so I thought she would enjoy using these.
So the only thing left to do is paint the huge Dr.Seuss murals. Who knows when I will get around to doing that. I am just glad I was reasonable enough to know I could not do it before Christmas.
Well my Christmas party is tomorrow so I better get baking.
Labels:
before and after,
christmas,
d.i.y,
decorating,
Dr.Seuss,
for kids,
furniture,
ikea,
sewing,
tags
Tuesday, December 1, 2009
Ikea Holiday Lights

Santa's Elves made a trip to Ikea last night to pick up some items for Jayna's playroom we are giving her for Christmas. It wasn't on the list of things to look at, but my eye still caught a glimpse at all the fun holiday lighting they sell during Christmas time. They have the coolest lights to hang over your windows indoors. Next year I have got to remember that they have such fun things. As for this year the Christmas decorating budget has already been spent. See you next year fun lights.


Subscribe to:
Posts (Atom)










12.15.09+no+background.gif)


