Showing posts with label recipe. Show all posts

Monday, March 14, 2011

Everyones Mad Here

This year for our joint birthday Jayna and I decided to have an Alice in Wonderland themed tea party. It turned out great and everyone had a wonderful time in "Wonderland" celebrating with us.

We sent our invitations out with little skeleton keys attached to them with direction to bring the keys back to the party. I copied the invitation idea from an Alice in Wonderland comic-con party Disney held. It was easy to find a free Alice in Wonderland font online too. The skeleton keys were a little tricky to find at first. I kept thinking I needed antique ones, but they were really expensive and ranged in price a lot from place to place. Then I tried my luck at Lowes and to my surprise they had the perfect little key. The secret is to go ask the "key making man". They were not out in packages, he just had a little box of them behind his desk. If I remember right they were like $3.00 each which was cheap compared to the $10.00 antique ones.

Wednesday, February 16, 2011

I am in Baking Heaven

Remember my 1940's stove I purchased this last weekend? Well guess what?!? The oven bakes amazingly accurate. After reading forums and looking at range restoration sites on-line I found out quickly that one of the most common problems with antique stoves is that the ovens are way off and need to be re-calibrated, of which I knew the husband would not be into paying for. So after we hooked up the gas-line to the stove, checked for leaks best we could (I think I will still have the gas company come out and check it too) I whipped up a batch of blueberry muffins and put them in an old pan of my Grandmothers that was just as thick and hefty as my new stove. Then I turned the oven on, match lit it and turned it up to 425, put the muffins in, and crossed my fingers.

Monday, August 23, 2010

Lemonade Anyone?

The Lemonade stand went well last week with the girls. The weather cleared up just long enough for us to get a good hour of selling in. Only two out of thirteen girls showed up, but I am sure it was because a lot of them probably thought it was cancelled due to the weather. When life gives you Lemons you just make Lemonade though right? Or in this case Rosemary Lemonade and Pink Lemonade Cupcakes!

Monday, August 9, 2010

Crab Boil!

While my parents were in-town in July I decided to do a crab boil just for fun. It was a big hit and a blast to do. In-fact since then we have already done it again with some friends of ours.

Thursday, June 3, 2010

Daddy O Ideas: Video Flip Book Tutorial

Fathers Day is coming up soon so I wanted to share some fun gift ideas I found via MarthaI added my own little twist to some of them and a tutorial so 
"Read On".

Friday, May 14, 2010

Cupcake Frosting Secrets Revealed

It really is no big secret, but lots of you always want to know what kind of frosting I use for my
cupcakes. 
Well here it is! 
It is a Buttercream Frosting and I will try to share some of my tips for making it creamy and cupcake piping perfect.


Monday, May 3, 2010

Bread Bowls


Last week while the weather was cold I decided to make chili since it seemed like winter here. Can you believe it, chili in April! 


I found a great recipe on a childhood friends blog for homemade bread bowls and decided to try my hand at it. The bowls turned out great and tasted sooooo good. They were easy to make, and added that little extra something to our meal. 

Friday, April 30, 2010

Semiprecious Candies

I am gearing up for next weekends Bake Sale and have one more item to sell checked off my list. 


I made these cute bags of candy jewels with custom labels to match my Bake Sale flyers

Monday, April 26, 2010

Summer Two Pea Pasta


I made this pasta the other night for dinner. It was nice and fresh and something different, but I have to be honest it was not my all time favorite. If you want a fresh change though try it out and let me know what you think of it.


Thursday, April 8, 2010

Cowgirl Cookie Mix

cow girl cookie mix
I am busy working on making these wonderful cowgirl cookie mixes from Bakerella for my Bake Sale coming up next month. I am trying to make it easy on myself since I will be the only on baking for it. I thought these would make a great Mother Day treat too, since the Bake Sale will be right before Mothers Day. Now I just need to print her labels out and slap them on the jars and I am done. So fun and easy! See you tomorrow!

Tuesday, April 6, 2010

Homemade Sugaring Wax - Wax On Wax Off

homemade sugaring waxThe other night, in-fact it was the same night we painted the laundry room, the husband brought up waxing. To spare the innocent I will leave out the details of the conversation, but it got me thinking about sugaring. I had had this done on my sensitive areas one time before, and it was sooooo much better than being waxed. I also just figured out that there is an esthetician at Blush salon studio and spa that I go to that does this sugaring method. Then I wondered if there was an easy way to make sugaring wax at home.

Fancy that there was!

After watching 5 million horrible you tube videos on how to make it I tried it out myself. It is not the easiest thing to make by a long shot. The ingredients are very simple and what most people already have in their kitchens, but it has to be cooked just right. Not too much and not to little, which can be tricky when that is only a minute or two difference. There are videos online that show people using the sugaring in an almost putty consistency, but I could not get mine to that state. I did have success with my second batch though and was able to use it like a hot wax, spreading it on and applying a strip of muslin fabric over it and then ripping it off the area. It worked great! I was really happy with it and was excited to have a cheap waxing option that I could do at home.

I only have my eye brows waxed about twice a year, and get the "every blue moon" bikini wax. This made me excited to wax more. Cost wise it has never been worth it for me to wax my legs, arms, or face. I would never think about trying grocery store waxes for the sole worry of bad reactions to cheap chemical mixes. This is all natural though, which means little to no chance of reaction. I remember when I got it done I had no irritation or break-out at all. Which I loved, I mean who wants to go exchange hair for a rash and pimples. No thanks!

homemade sugaring wax
So the recipe for sugaring wax is...

2 cups sugar (any sugar, I used white)
1/4 cup water
1/4 cup lemon juice (fresh squeezed or bottled)

Place and mix these ingredients in a sauce pan on the stove over a medium high temperature. The mixture will begin to bubble and boil a little (make sure not to over boil). After about 5 minutes the mixture will at some point begin to change color. When it looks a golden brown (almost like honey) you will want to remove from stove and pour into a clean container for storing (one that can be reheated). You can also get a spoon-full of the sugar water and run it under cold water to make sure it is sticky and will slightly ball up to see if it is done. Others said that a candy thermometer reading 260 will indicated a done sugaring wax (I did not have one). Let it cool for an hour or two. To heat it up just stick it in the microwave for about 30 seconds until it is a honey like consistency. Check how hot it is before applying to skin.

I loved the final working batch, but this can be frustrating to try and master. I think it is for-sure one of those things that you will love doing once you get it down though.

My poor husband and his brother had to be my ginny pigs for this wax in-between painting. It was a fun random night of crafts and projects though.

I will do a video on this as soon as I grow some leg hair out and get more sugar.
LOL!

Sunday, March 28, 2010

Bake Sale Baby!

bake sale ideas
I keep forgetting to share this on the blog. Awhile back the Husband and I decided that we wanted to take a trip to Southern California this summer. We had even more incentive since Disney was doing their day of service campaign, where if you signed up to do a day of service with a registered organization you could get free tickets to one of their theme parks. So I got online and signed up for a day of service that sounded right up my alley. A Bake Sale! It is a bake sale with
Bake for Hope, which benefits Susan G Komen for the Cure. Anyone can be apart of it and you can make it as big or little a deal as you would like. We are going to be holding ours for our neighborhood and are just going to set-up in the front yard.

I plan on passing these flyers out door to door a couple days before the bake sale and then baking my little heart out and hoping for the best.

bake sale stand idea
I really want the husband to make this for me for the bake sale (I found it online, but can't remember where, sorry). Out-look not so good though. When I told him what my ideas were he just looked at me and said "I might as-well just buy our Disney Land tickets". Which would probably be true if I did everything I wanted to. I just have big visions. Hopefully I can scale back a bit, but still have the cutest Bake Sale the neighborhood has ever seen. Mark my words though one day I will build that. Jayna would love it, and so would I.

Side Note: You have to know how many projects my husband helps with and does. He makes all my visions and dreams come true. We are always teasing each other and anything I say about him is all in good fun. Just wanted you to get the tone I was saying that in.

bake sale ideas
I plan on mostly making cupcakes.

bake sale ideas
Then having fun side things like chocolate dipped pretzels with sprinkles, bags of candied jewels, maybe some cake pops, jars of pre-made cookie mix, etc.

I just hope people come. So come if you would like.

*For information on where and when the bake sale will be, or files for the flyer shown in this post click here.

Friday, February 19, 2010

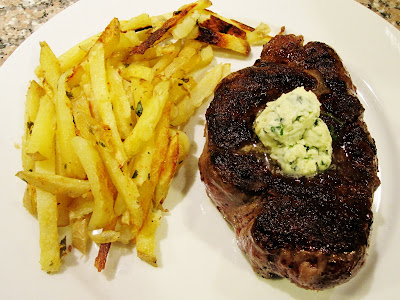
Filet Mignon with Herb-and-Cheese Potatoes

filet mignon recipe homemade fries
Here is a
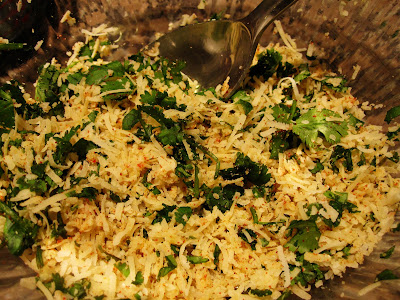
dinner recipe I tried out this week courtesy of Martha. It turned out really good and was very yummy. Just don't believe Martha when she tells you that if you put olive oil on your baking sheet your fries will not stick. I will be using parchment paper next time. She also forgets to mention what temperature to bake the fries at. We bake ours at about 400 degrees usually. I substituted the cotija cheese which my grocer did not carry for hand grated parmesan cheese, and used sweeter yukon potatoes instead of russet potatoes. Cotija is very similar to parmesan so it work out just fine.

filet mignon recipe homemade fries

This was an easy recipe with minimal ingredients, but lots of flavor. The butter was amazing on the filet mignon. I will for-sure be making the fries again and would love to serve this meal to dinner guests if I can bring myself to spend the $ bucks $ to do it. Our two filets which were a decent size cost $13.00. Compared to going out it is a good price, but it would be expensive to do for a full dinner party with guests.

Wednesday, January 27, 2010

Potato Skins for the Big Pig Skin Game

Supposedly the Super Bowl is coming up soon, or something like that. So says the only person with more testosterone than estrogen in our house.

potato skin recipe
We make these potato skins all the time, and they would make the perfect addition to a Super Bowl spread. Should you be so lucky to be in-charge of one.

How to Make:
You just wash and cook your potatoes in the oven at 375 for about an hour or until soft. Then you take them out and let them cool enough so that you can handle them. Then just cut them in half and with a small spoon scoop out the centers of each half. I like mine to still have plenty of potato in them so I just do a shallow scoop deep enough to place topping. Then you lay them out on a baking sheet and brush them with a mixture of 2 tablespoons vegetable oil and 1 tablespoon chili powder with a couple drops of tabasco sauce mixed in. Then fill them with shredded cheddar cheese and top with already cooked and broken up bacon and chopped green onion. Place baking sheet in the oven and cook at 375 until cheese is completely melted and serve with dollops of sour-cream on each potato skin.

Friday, January 22, 2010

Don't Play With Your Food

"Don't play with your food", may be what your mother told you when you were a kid, but it is just fine to do now that you are an adult.

I have a stacking recipe book that sadly I have only tried one recipe from. It is an awesome recipe though, and always impresses anyone I make it for. So when I want to feel like an amazing chef I just cook this up.

You even cook the final product in a pineapple can of all things, and make your own tortilla disks.

So have fun with your food. Don't be afraid to try the new or different.

If you would like this recipe to be posted just leave a comment saying so. I just didn't feel like typing that much this-morning. Thanks!

Thursday, January 21, 2010

Winter Pot Roast

This winter pot roast with baby carrots and potatoes is just like your Grandma's pot roast she used to make for Sunday suppers. It takes just as much time to cook as your Grandma's pot roast took, but it is worth it.

I first set the oven to 375 and seasoned the roast generously with salt and pepper. Then I dusted all sides of the roast with a light coating of flour.

The recipe calls for a Dutch oven, but I did not have one so I double checked my pots and pans warranty info and found that they are oven safe, so I used my large stock pot instead. I heated up 1/4 cup olive oil in my pot on the stove and then browned each side of the roast. Once I was done browning the roast I removed it from the pot, poured out the oil and fat and then returned it to the pot.

Then I added to the pot a heel of celery, a quartered yellow onion, 3 bay leaves, and beef broth until it covered the roast (about 98 ounces). Then I place my pot with the lid on in the preheated oven for 3 1/2 hours.

After the 3 1/2 hours was up I removed the pot from the oven discarded the vegetables and bay leaves, and skimmed the fat from the surface of the broth. I then scattered my baby carrots, chopped celery, and baby new potatoes around the roast. Covered the pot and returned it to the oven to cook for another 40 minutes or until the vegetables were tender.

Then I just removed the roast from the pot, sliced it up and placed pieces in shallow bowls topping the meat with both broth and vegetables. It was the perfect Sunday Meal on a cold winter night. It made for great leftovers too, and your husbands will love the aroma in the house while you are cooking it.

Wednesday, January 20, 2010

Focaccia Bread


The other night I added a little something new to my homemade fettucini alfredo meal.

homemade focaccia bread
I made homemade focaccia bread. It took a couple of hours to make, so it was tricky to time it since it is best served pipping hot right out of the oven. I topped it with olive oil, parmesan cheese, course kosher salt, rosemary, and garlic. It turned out amazing! The top tasted just like the bread at Macaroni Grill, which I love. I served it with a plate of olive oil and balsamic vinaigrette too.

homemade focaccia bread
I love making bread because it is so rustic, and has been done since the dawn of time pretty much. I have made a new goal to learn how to make as many different kinds of breads as I can this year. So I am hoping that come this next New Years Eve I will be-able to make my own Sourdough bread for fondue.

Tuesday, January 12, 2010

Pound Cake with Blackberries and Blueberries


I obviously have food on the brain because I have been posting and trying a-lot of new recipes lately. Maybe I just didn't want to start out the new year with the same old recipes we always make. That and I did watch the movie Julie & Julia which I highly recommend. Just be prepared to want to cook a-lot after you watch it.

This is a great pound cake recipe out of a kind of interesting recipe book that has never failed me yet.
It is the Nordstrom Friends and Family Cookbook. You just don't normally associate Nordstrom with cookbooks. Now those of you that know me well know that I worked there for years, so it is not weird that I have one. I already have an amazing baked salmon and taco soup recipe that I regularly use from this cookbook. Now I have just been inspired to try the other recipes in the book as-well. So most likely all my future food posts will have come straight from this book. If you want a copy I believe you can still purchase them at Nordstrom in their cafe. I know they have two of them so don't get confused.

P.S. I promise I have some non-food related crafts and projects in the works to share with you.


Get Out the Tissues


Get out the tissues because I made a good meatball soup, and it has a ton of onions in it.

Ryan and a friend went up skiing this last week and this was the perfect meal to greet them with when they came home from a freezing day on the slopes.


If you would like this recipe just send me a quick email. If I get enough requests I will post the recipe later. Hope everyone is keeping warm this winter.

Sunday, January 10, 2010

Go Fish!

fish and chips recipeAt our house we have fish about once a week. We usually put a dry rub on it and pan sear it in a little butter, but this week we ran out of our favorite rub and decided to try something different.

I have never tried to batter and fry fish at home so I thought this would be a great time to experiment. Now I know this kinda defeats the whole purpose of having fish once a week, since we do so because it is so health for us, but you have to let things slide every now and then.

I found this really simple batter recipe online. In-fact I thought it was too simple to be any good, but boy was I wrong. These were the best fish and chips I have ever had!

homemade french fries
We used swai fish fillets and they were just melt in your mouth. The fries were freshly cut potatoes that we laid out onto a sprayed cookie sheet and baked in the oven for 30 minutes or so. Then we sprinkled a little salt on them.

Batter Recipe:

1 cup all-purpose flour
1 teaspoon baking powder
1 teaspoon salt
1 teaspoon ground black pepper
1 cup milk
1 egg
1 quart vegetable oil for frying
1 1/2 pounds cod fillets or favorite white fish

Directions:

In a medium size mixing bowl, mix together flour, baking powder, salt, and pepper. Stir in the milk and egg; stir until the mixture is smooth. Let stand for 20 minutes.

Preheat the oil in a large pot or skillet to 350 degrees.

Dredge the fish in the batter, one piece at a time, and place them in the hot oil. Fry until fish is golden brown. Drain well on paper towel.

Hint: we cut our fillets into fourths and they fried a lot better than a whole fillet would

This was such a fun and different dinner. I will for-sure make this during the summer for family and friends.