

Showing posts with label sewing. Show all posts
Showing posts with label sewing. Show all posts
Monday, December 13, 2010
Play with Your Food


Saturday, October 30, 2010
The "Queen" has arrived

Sunday, October 24, 2010
Upholstery Reveal!

BEFORE
I got my living-room chairs back awhile ago, but have been trying to wait and show you the whole room makeover, but now that some projects are on hold and the Halloween decorations are up, I decided I can not wait any longer and have to at least share my chairs with you.
Thursday, September 2, 2010
My Achy Breaky Heart


So to top off this post I thought it would be appropriate to include a tutorial I found for a cute little heart pin you can easily make with craft scraps. So here is to Hearts and all that they do for us. I know I am more grateful for mine now.
Monday, August 23, 2010
Lemonade Anyone?

Wednesday, March 17, 2010
The Craft Room of My Dreams

condo craft room
When we were looking for a new home after selling the condo it was hard to find a house with everything we wanted, but that is always the struggle when looking for a home. Then we found the house we are currently in. It had everything we wanted and much much more than we ever thought we would get out of a home. It was a home I had found online, and I remember walking into it for the first time. It seemed to good to be true, the first floor was so open and it was fresh looking. I walked past the living room and dining room, and then I turned the corner from the family room to see this space off the kitchen dining area.

"Ahhhhhhhh"(in angelic heavenly voices) is what I must have heard. It was the holy grail of craft room spaces right down to the french doors that adorned its entrance. (ignore the mess in there) I wish I could share it with every crafty women who does not have enough space at home, who is crafting at the kitchen table, or working out of a makeshift closet.

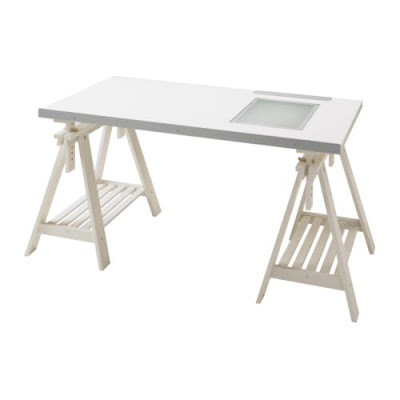 I got one of my craft tables for my birthday and will save up my pennies for the other one.
 We are going to be building desks that I will paint black to go around the room similar to these Pottery Barn ones, and we will also have some storage bookcases on one of the walls as-well. I am hoping to also put shelving in white around the top of the room like the picture above.
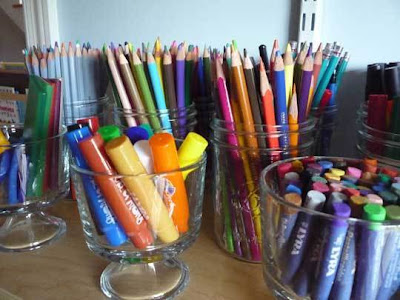


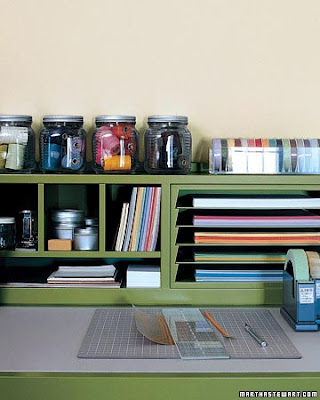


We are going to start slowly working on this room, and this is my inspiration. I have already bought the paint. It is going to be the same color blue as the playroom upstairs that we did for Jayna.
 I got one of my craft tables for my birthday and will save up my pennies for the other one.
 We are going to be building desks that I will paint black to go around the room similar to these Pottery Barn ones, and we will also have some storage bookcases on one of the walls as-well. I am hoping to also put shelving in white around the top of the room like the picture above.
I have big visions for this room and love that it also has a little door to the backyard off of it. I picture kids doing homework, me sewing drapes, and the husband working on the computer at a corner desk. Here are some other craft room inspirations that I love. I will keep you updated on this room as we go. For now we will all dream together.


Monday, December 21, 2009
Dr.Seuss Playroom
Santa's elves are all done with Jayna's Dr. Seuss playroom. It has turned out really nice. I was shocked at how well the toys fit. I thought for sure I would need double the storage, but I didn't. In the future I will probably add another bookcase or two, but for now the storage is perfect. I didn't even use one of the white baskets and three of the pop-up storage bins.

Here are before pictures of the playroom. It was just a basic plain white room with no closet and a little alcove.

Out in the hall I hung this picture of Dr.Seuss books above the door going into the playroom. I love how it looks so much that I am now planning on putting little frames above all the doors in the hall hinting to what rooms they are. Kinda like on imagination movers. lol. You stay-at-home moms know what I am talking about. It will look so much better once I paint the hall too.
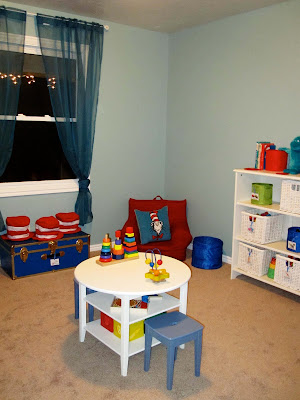 We painted the room Tembleque from Kwal paints. It is a really pretty blue with a little hint of green. I think I may even paint my craft room downstairs this same color. The table, stools, baskets, and bookcase are from Ikea and were really good prices. I found the blue trunk forever ago at a thrift store and even consigned it, but no-one bought it so I ended up with it again. I have kept it all this time hoping to find the perfect home for it. I am glad I did because it looks great in this room and holds tons of toys. The red chairs are the medium size Pottery Barn Kids everywhere chairs. I think they are even on sale right now. The curtains are also from Ikea and where really cheap, and the Dr. Seuss hats I bought at Target for the Dr. Seuss baby shower I did awhile back.


 I made these little labels for all the toy baskets. I thought it would be a good teaching tool to help little Jayna learn how to put her toys away. To make them I just took pictures of some of her toys on top of a white piece of paper. Then I loaded them into photoshop and adjusted the levels of the colors a little, printed them out onto photo-paper, and used self-laminate sheets to make them kid durable.
 On one of the walls I but a large magnet board I picked up at Ikea. I placed it really low so that she could use it while sitting on the floor. I have not found any good magnet letters for her yet, so I turned the buttons I used at the Dr.Seuss baby shower into magnets. I just took the pins out and added little strips of adhesive magnets to the back of them. I had picked these bags up at Target too and decided they would look cute hung on hooks in the playroom. Jayna loves filling up little bags with toys and treasures so I thought she would enjoy using these.

So the only thing left to do is paint the huge Dr.Seuss murals. Who knows when I will get around to doing that. I am just glad I was reasonable enough to know I could not do it before Christmas.
Well my Christmas party is tomorrow so I better get baking.


Here are before pictures of the playroom. It was just a basic plain white room with no closet and a little alcove.

Out in the hall I hung this picture of Dr.Seuss books above the door going into the playroom. I love how it looks so much that I am now planning on putting little frames above all the doors in the hall hinting to what rooms they are. Kinda like on imagination movers. lol. You stay-at-home moms know what I am talking about. It will look so much better once I paint the hall too.
 We painted the room Tembleque from Kwal paints. It is a really pretty blue with a little hint of green. I think I may even paint my craft room downstairs this same color. The table, stools, baskets, and bookcase are from Ikea and were really good prices. I found the blue trunk forever ago at a thrift store and even consigned it, but no-one bought it so I ended up with it again. I have kept it all this time hoping to find the perfect home for it. I am glad I did because it looks great in this room and holds tons of toys. The red chairs are the medium size Pottery Barn Kids everywhere chairs. I think they are even on sale right now. The curtains are also from Ikea and where really cheap, and the Dr. Seuss hats I bought at Target for the Dr. Seuss baby shower I did awhile back.
Here is the finished playhouse. It turned out super cute and I am very proud of myself for whipping it out as fast as I did. I still need to trim the door a little and we are going to make a miner adjustment in the frame. I love it. I think this will be Jayna's favorite part of the room so I am really glad we thought of it.(click for playhouse frame how to)
I made these little labels for all the toy baskets. I thought it would be a good teaching tool to help little Jayna learn how to put her toys away. To make them I just took pictures of some of her toys on top of a white piece of paper. Then I loaded them into photoshop and adjusted the levels of the colors a little, printed them out onto photo-paper, and used self-laminate sheets to make them kid durable.On one of the walls I but a large magnet board I picked up at Ikea. I placed it really low so that she could use it while sitting on the floor. I have not found any good magnet letters for her yet, so I turned the buttons I used at the Dr.Seuss baby shower into magnets. I just took the pins out and added little strips of adhesive magnets to the back of them. I had picked these bags up at Target too and decided they would look cute hung on hooks in the playroom. Jayna loves filling up little bags with toys and treasures so I thought she would enjoy using these. So the only thing left to do is paint the huge Dr.Seuss murals. Who knows when I will get around to doing that. I am just glad I was reasonable enough to know I could not do it before Christmas.
Well my Christmas party is tomorrow so I better get baking.

Tuesday, December 8, 2009
Dr. Seuss Playhouse Sneak Peak

I am almost done with the Dr.Seuss playhouse we are making for Jayna's Dr. Seuss playroom we are giving her for Christmas. It is all sewn together and I just need to trim the door down to the right size, and make one more window. It was way easier to sew together than I thought it would be, thank-goodness, and all my measurements were right. You would be even more impressed if you knew what kind of machine I made it on. I describe my sewing machine as the one up from the sewing machine that says Barbie on it at Sears. That is pretty much the truth too. The little guy pulled through for me though, and it was our biggest sewing project to date. I will post pictures of the finished playhouse along with the playroom when we are done with it. As for now this sneak peak will have to do. I have to get cracking on painting the playroom this weekend so we can put everything in it.
Wednesday, November 18, 2009
Holiday Guest Favors

I am going to be holding a Christmas open house party since both Ryan's side of the family and my side of the family will be in-town for Christmas. We think it will be a good opportunity to have both families together and will allow us to see everyone at the same time so we do not have to be running from place to place Christmas week.
I saw these felt corsages in my recent Martha Stewart magazine and I thought they looked so festive and would be fun to make for all my guests to wear the night of the open house. So hopefully between making the playhouse, and painting the playroom I will be able to make these cute little guys.
Monday, November 16, 2009
Pottery Barn Kids Playhouse Lookalike

This last Saturday Ryan, Jayna, and I all went to Pottery Barn Kids to buy two red Everyday chairs for her Dr. Seuss playroom, that hopefully will be "mostly" done by Christmas (cross my fingers). While there Jayna loved playing with the different toys and kitchens, but she especially loved this little playhouse. She loved looking out the windows and playing pica boo with the door. I was talking to Ryan about how much she liked it and he said we should make her one for the playroom. I was surprised he wanted to do another project for that room, but I was not going to pass up the offer. I said regarding the frame "you think you can make that?", his response was "I can make that in two seconds!" So I challenged him to make it that night...
Instructions on This Project:
1. We figured out all of our measurements. Pottery Barn Kids had most of them listed on their website so that was a good starting point for us.


2. Ryan went to the hardware store and picked up several PVC pipes and lots of PVC joints.

3. We cut all of our PVC pipe down to the right lengths using a pipe cutter. Your husband may have one if he has ever worked on the sprinklers. It is a lot easier then using a hack saw and there is no mess with the pipe cutter.

4. We started putting our frame together with all of our joints we purchased.

5. The pitched roof took some additional calculating of which I can not re-explain to you since square roots were involved.

6. Then with-in less then twenty minutes (almost = to two seconds) We had the frame of our playhouse.
So Pottery Barn can keep it's $200 playhouse. Although now it is up to me to sew the fabric for it and add all the little touches and details to it. I am going to do the house out of felt and it will be a Dr. Seuss house of course. I just have to find time to fit it in before Christmas.
I will have more details on this project later, and depending on how easy it is to sew I will think about selling kits if anyone is interested. This playhouse is a lot like the card table playhouses if you have seen those. I love the pitched roof though and it allows taller older kids to play in it as-well. So your kids will not grow out of it as fast.
So, thank you awesome husband!
Wednesday, November 11, 2009
Back in the Day Crafts

I was visiting a friends blog the other day and saw this picture of a dress we had made for her dog. I had totally forgot about that particular dress, but defiantly remember our adventure into making dog clothes for our little furry friends. Our husbands did not want us buying dog clothes with the little money we had a college students so we found our way around that and made our own.
I think I will keep Back in the Day Crafts as a recurring thing and post about crafts from the past either I or others have done.
Wednesday, October 14, 2009
Before and After: Wicker Chair

I have a great story behind this project that will probably reveal too much about me.
The Story: When we were making offers and looking at the house we now live in I instantly knew what kind of look I wanted for the front room. More specifically I knew I wanted a big grass or whicker chair, but knew they were pretty expensive and hard to come by. I told Ryan my plans several times, of which I am not sure he really "got it".
So the morning we were moving out of our condo to move into the new house I drove him to the truck rental place to pick up the moving truck. On the way there we drove down 7th East and there it was on the side of the road at a yard sale. I totally freaked out and begged Ryan to stop and pull over so I could look at it. He looked at me like I was off my rocker. He said, "woman we are moving this morning, what do you not understand about what we are doing right now." I knew he was right, but my thought process was just that it would be perfect because we would have a big moving van to pick it up in. He stressed once again to me that we were late and that people were going to be at our house any second to help us move everything we own (which is a lot sad to say). I dropped him off and he told me to take the free-way over to the grocery store were I needed to pick up donuts and drinks for our helpers. So I was over it. I was not going to pass it again and my chair was gone. I went the way Ryan had told me to go to get on the free-way, but there was no entrance. I called him and he told me to just go back the way we came. I could hardly handle it, the chair was back into play. I stressed about seeing it again and checked my wallet to see if I even had any money. I had twenty dollars and not a cent more. I hesitantly pulled over to the yard sale and jumped out of my car. I started running towards the yard sale and then saw a lady sitting in the chair asking questions about it. I turned around and ran back to the car nervous I was wasting my time. Then I figured what the heck. I ran back over and asked the lady how much the chair was. I had decided that no matter what she said I was just going to blurt out "twenty dollars take it or leave it". She said by way of miracle, "how about twenty dollars?" I practically threw her the cash and asked for help taking it to my car. I was petrified! I knew Ryan was going to be rounding the corner any second in a huge moving truck only to find his wife yard selling on moving day. I was practically running to the car with the chair, and dragging this ladies poor husband with me. I threw the seats down in the jeep, and tossed Jayna's car seat to the front (she was being babysat). The guy said "I do not think this will fit" and I just looked at him and said "oh, it's going to fit". Seriously though if this chair would have been half an inch bigger on any side it would not have fit in my car. I sped off and successfully avoided running into the husband. I confessed back at the house, and he was glad it worked out and that I was able to get my beloved chair.

The Project: I spent countless hours ripping off the old cushion or what was left of it after many years. There where hundreds of staples in the chair which I took out with needle nose pliers. I power washed the chair down, and got all the dirt and junk off the chair. Then I let it dry for 25 hours or so. Then I brushed on a clear coat of lacquer. The lacquer is important, because a poly would have dried too stiff for the wicker since wicker flexes. It worked like a charm at restoring the shine and luster of the reeds. I took some canvas type fabric and stretched it and stapled it to the base of the chair over the springs. I bought some foam and trimmed it down with an electric turkey knife and sewed a cover for it. I lucked out on the fabric, because it only cost me $2 a yard. I think it turned out pretty good though for my first box cushion. I just need to make pillows for the back now.
* If you have any questions on how this project was done just email me. Thanks.

The Project: I spent countless hours ripping off the old cushion or what was left of it after many years. There where hundreds of staples in the chair which I took out with needle nose pliers. I power washed the chair down, and got all the dirt and junk off the chair. Then I let it dry for 25 hours or so. Then I brushed on a clear coat of lacquer. The lacquer is important, because a poly would have dried too stiff for the wicker since wicker flexes. It worked like a charm at restoring the shine and luster of the reeds. I took some canvas type fabric and stretched it and stapled it to the base of the chair over the springs. I bought some foam and trimmed it down with an electric turkey knife and sewed a cover for it. I lucked out on the fabric, because it only cost me $2 a yard. I think it turned out pretty good though for my first box cushion. I just need to make pillows for the back now.
* If you have any questions on how this project was done just email me. Thanks.
Subscribe to:
Posts (Atom)


12.15.09+no+background.gif)


